
How to use WebSockets in Golang

Hey there! So, in today’s digital world, we all want things to happen super fast, right? Like, when you’re using apps or websites, you expect them to give you what you want right away. If things take too long to load or if there’s a delay, it can make your experience kind of annoying, no matter what you’re doing on your phone or computer. We all want things to work quickly and smoothly!
So, back in the day, sending and getting messages on the internet had some tricky parts. Imagine waiting for a message and it taking forever because of server issues—not cool for developers or users, right? But then, in 2008, something awesome happened—WebSockets came into the picture and made real-time apps much easier to build!
In this article, we’re going to dive into the world of WebSockets and see how we can use them to create a cool GeoLocation feature in Go, and we’ll even bring Redis along for the ride. We’ll really dig into WebSockets, set them up in Go, and then see some cool things we can do with them.
If you’re just starting with Go, it might be helpful to first check out web servers in Go. Ready to roll? Let’s do this!

What are WebSockets?
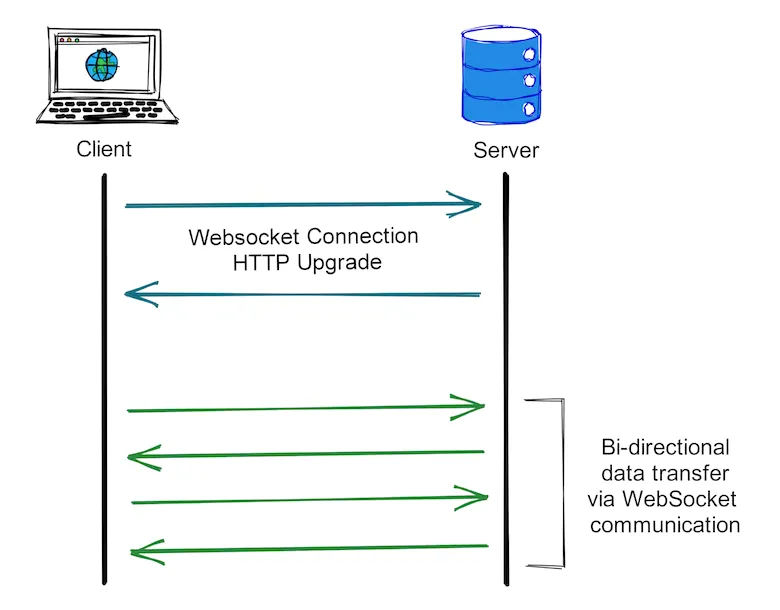
Absolutely! WebSockets are like supercharged communication highways on the internet. They use a full-duplex system, which means both the server and the client can talk and listen at the same time over a single, strong connection called Transmission Control Protocol (TCP).
The cool thing about full-duplex is that it makes communication faster and more efficient. Unlike some other methods, like HTTP polling, where you have to wait and check for messages, WebSockets let information flow freely in both directions without any blocking. This reduces the delays and makes real-time communication a breeze.
Here’s the secret sauce: WebSockets start with a handshake, a bit like saying, “Hey, let’s talk using the WebSocket language.” This handshake uses the HTTP Upgrade() header to switch from regular HTTP to WebSocket magic.
Once that’s done, data can zoom between the server and the client without the client asking for it every time. It’s like having an open line for conversation, and it stays open until either the client or the server decides to end it. This allows for super quick and real-time back-and-forths.
And guess what? Most of this happens on TCP port number 443, making it a well-known meeting place for WebSockets to do their thing. Cool, right?
The WebSocket protocol specification defines two URI schemes:
- WebSocket (
ws): used for non-encrypted connections - WebSocket Secure (
wss): used for encrypted connections
Let’s explore each step in building an app using WebSockets.
Setting up the HTTP server

Start the server by runninggo run main.go. When you visit, you should see the following output:
Go WebSocketsInitiating a handshake
Setting up a WebSocket connection involves this cool one-time handshake between the client and the server. It’s like a secret handshake for the internet.
The handshake uses the Upgrade() method to switch from the regular HTTP connection to the WebSocket protocol. This is the moment where they agree, “Hey, let’s talk in WebSocket language from now on.”
Now, here’s a neat trick: Using defer to close the connection when the server stops. It’s like saying, “Okay, we’re done chatting for now, let’s tidy up.” defer is a keyword in Go that helps you ensure that a function call is performed later in a program’s execution, usually for purposes like cleanup. In this case, it helps make sure that when your server stops, it properly closes the WebSocket connection.
So, in summary, you shake hands once to start talking in WebSocket language, and then when the server is done, you use defer to politely close the connection. It’s like being a good internet citizen! Keep up the good work with your WebSocket adventures!
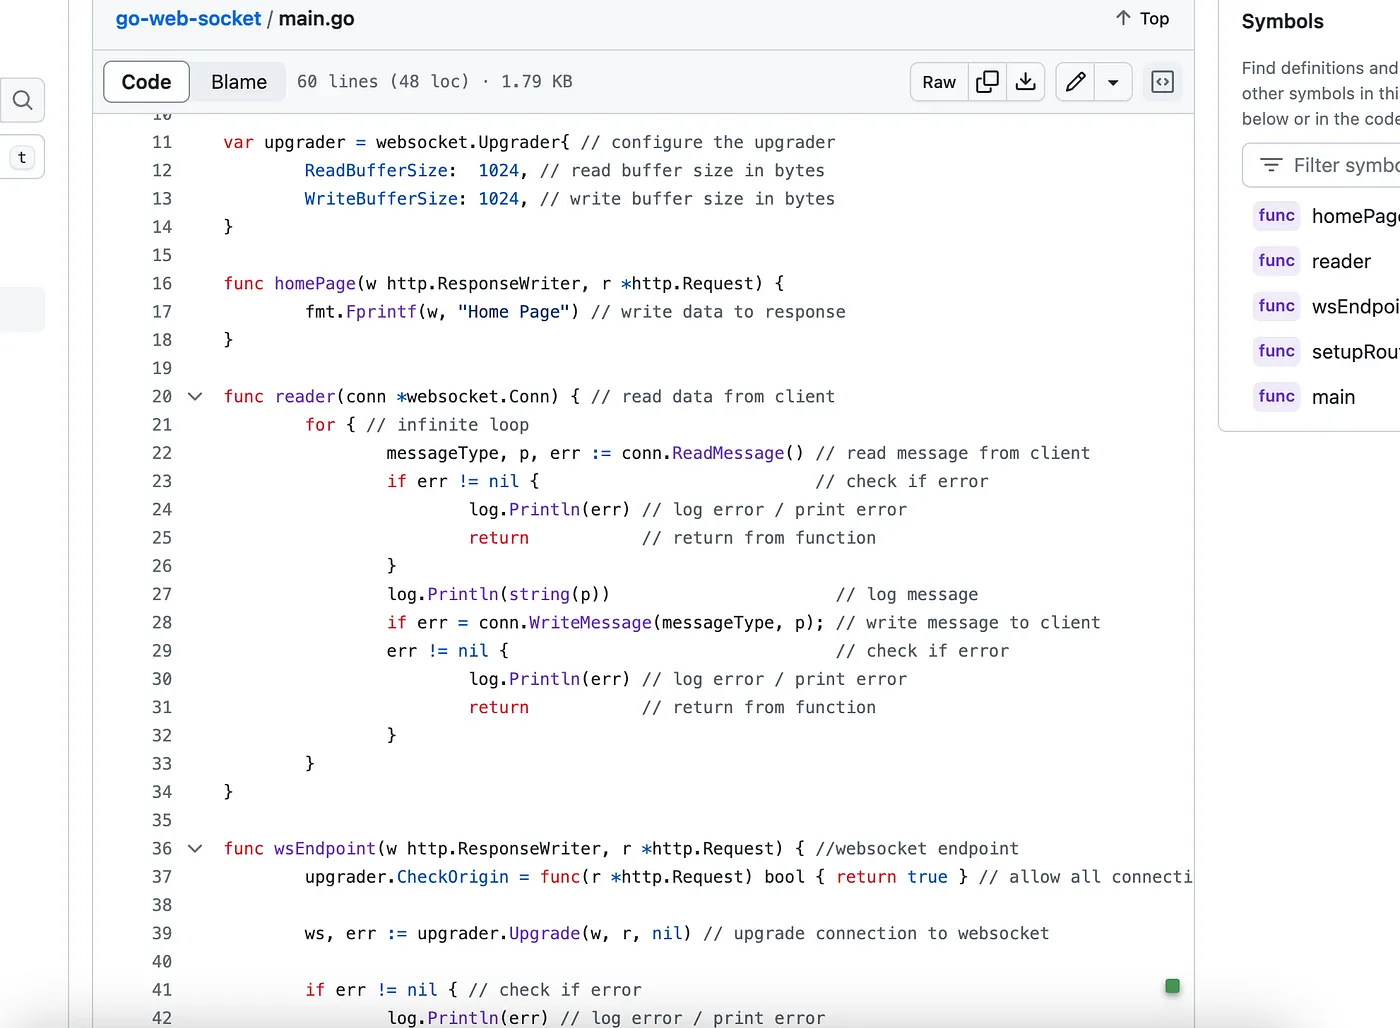
Let’s modify ourmain.go file to set up a WebSocket handshake:
Note: The client must send the first handshake request. Then, the server can authenticate this WebSocket request and reply to the client with an appropriate response.
conn, err := upgrader.Upgrade(w, r, nil)
if err != nil {
log.Print("upgrade failed: ", err)
return
}
defer conn.Close()
I will attach a sample project here that I implemented.
Use cases for WebSockets
You’re on the right track! WebSockets are indeed superheroes of two-way communication. Their main job is to support full-duplex communication, meaning the server and the client can chat both ways simultaneously. This is awesome for real-time updates and quick exchanges.
One cool feature is that WebSockets are like multitasking wizards. A single, lightweight server can handle multiple open WebSocket connections at the same time. It’s like having one person juggle multiple conversations without breaking a sweat.
And guess what? WebSockets are not just picky about where they work. They play nice with Android, iOS, web, and desktop applications. It’s like a big, happy family of compatibility.
Now, here’s the exciting part: WebSockets can keep the connection between the client and server alive for a long time. Unlike some methods that require you to constantly check in, WebSockets can chill and maintain the connection for extended periods.
So, where do you commonly find WebSockets doing their magic? They’re often the go to choice for applications that need real-time updates, like chat applications, online gaming, financial trading platforms, and anything else where speedy communication is key. They’re like the rockstars of instant data exchange! Keep exploring and discovering the wonders of WebSockets!
- Real-time messaging
- Multiplayer gaming
- Live score feeds
- Collaborative editing tools
- Live location and direction apps
- Audio and video chat using WebRTC
Here is the project that used Redis GeoLocation with Golang, You can refer to it using this link CorporateUserbackend
References
Follow me on GitHub: MadhushaPrasad